Last Friday night was games night! My good friend arrived for the evenings battles.
First up he handed me some sprues from Test of Honour as he had bought the game and kindly (rather awesomely I have to say) spilt the forces with me so soon I will have some samurai led forces to add to my model collection.
 |
| My 3 samurai heroes! |
I'll obviously post pictures of the Japanese force progress.
First game of the night was Across the Dead Earth. I made up a map of a small area for a campaign between our 2 main gangs. The Coggers (my friends gang) and the 78th Smethwick Irregulars (obviously my gang). The premise was a captured map off a State explorer about a recently discovered area.
 |
| The captured map |
Basic I know but I'm no artist. It's spilt into a grid. You win a game you take a grid. Get all the grids you win! Or capture the opposing gangs HQ grid you win. This idea uses one of the suggestions in the back of the Across the Dead Earth rulebook as a base. So the battle was a capture the objective and hold it. The objective in question was an abandoned Tesco store. Both gangs at one end of the board with the Tesco on sight. Some modest loot tokens were around as well.
 |
| The game board |
My gang has a new member Grimm the gunslinger (using my gunslinger model I got by backing a kick starter last year). The gangs lined up and away we went.
Our gangs ran up the sides of the battle field a few peeling off to exchange fire to slow up the oppostion
 |
| SNAFU and his usually reliable special assault rifle jammed the first shot fired!!! |
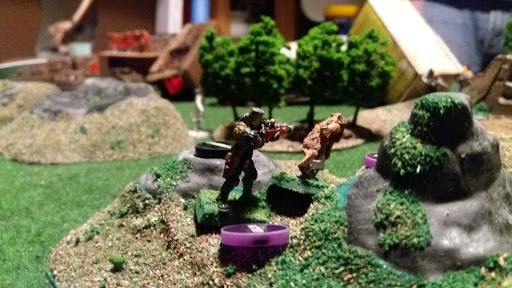 |
| Dead Eye Dave steps up and adds to the shooting but another poor showing |
My first attempts at shooting went terrible the dice rolls were not with me! About half my gang made for Tesco the other kept an eye on being flanked by the opposing gang.
 |
| Grimm after clearing a jam takes down a Cogger with his hand cannon |
 |
| My leader heads the charge for Tesco |
Grimm jammed his pistol (I swear I have never had that many hand before!!!) The gangs started getting close now.
 |
| Adahy my scout bravely takes on Wall the Coggers melee specialist |
 |
| And with a superb roll wins the melee!!! |
SNAFU forgetting his jammed assault rule pulls his tomahawk out and engages Lug the Coggers LMG specialist.
 |
| SNAFU takes out Lug in melee |
 |
| A Cogger takes possession of Tesco and waits weapon ready |
Next turn up SNAFU decides to take out Lug from the game completely but wait my opponent pullled out a grenade and boom!!!!
 |
| My opponent played our 2nd favourite event card!! Can't beat trip wire! |
The grenade took out both out gang members. We love the event cards especially this one but our favourite is trip wire can't beat a bit of petty stopping players running with loot ha ha ha
 |
| Adahy falls to Cogger reinforcements |
The alley next to Tesco becomes a focal point. Adahy is shot ,a Cogger jams his assault rifle and Dead Eye Dave rolls a head shot instantly taking a Cogger out of the game!
 |
| Selene takes out the last Cogger in the alley |
With the alley cleared there is one Cogger left holding out. My gang close in on Tesco. The lone Cogger leans out the door and fires but to no affect
.
 |
| My leader charges the door with his axe |
The last surviving Cogger was took down in melee and I win the game.
I chose a grid on the map so now that's my territory. Also got a bit of loot and bought me a silencer to add to my gunslingers hand cannon (not sure how that works but he he he).
Next up Star Wars Armada
 |
| The fleets line up |
We played a 300pt game. (Though we forgot to use various evade tokens but it was getting late and we still had fun lol) I was as always the resistance and had a fleet comprising off a Nebuleon B frigate (my strongest ship), 2 Corvettes, the Millenium Falcon, Luke Skywalker plus a handful of x wings and b wings. The opposing fleet had a Star Destroyer (still an imposing model), an Imperial Raider, Boba Fett, Darth Vader and a score of Tie fighters and bombers.
 |
| The Heroic Resistance |
 |
| The dreaded Empire |
 |
| A rather disorganised start from the Resistance Fleet. The Empire rolled forward |
 |
| The fleets engage! !! |
The fleets engaged the Corvette closest to the Star Destroyer bravelly hit it with all it had sapping shields but was stripped off all shields in return. Fighters engaged with each other trying to keep them away from their own capital ships.
 |
| Fully engaged in close range battle |
In the pic above you might notice the lack of an Imperial Raider. After being stripped of shields it received the full frontal battery of my Nebuloen B frigate and disintegrated. Also lost was Boba Fett after a dog fight with Han solo the Corvette added its fire and blew the bounty hunter out of the sky.
Unfortunately my frigate has taken a beating from various shots including Darth Vader and is in a vulnerable situation. The Corvette on the left has taken some horrendous damage from the Star Destroyers side guns.
 |
| The fleets pass through one another counting the cost |
As you can see from the pics above though getting some solid hits on the Star Destroyer my Frigate faced the full power of its frontal guns and was obliterated!!! The Corvette on the left speeds away desperately trying to raise shields to its rear as it is carrying a lot of damage. The Corvette on the right is attempting to get behind the Star Destroyer. My squadrons start to get the upper hand on their counter parts and bombers head for the Star Destroyer.
 |
| The Millenium Falcon swoops in |
The Star Destroyer has only one Hull point left after being attacked from long-range and the Millennium Falcon swoops in to the rear and scored the final hit destroying the Star Destroyer and winning the game.
Overall great games and lots of fun. I always love the skirmish action of Across the Dead Earth and Star Wars Armada grow on me more and more (can't beat a massive space battle!).
Have a great day folks


Sounds like a great evening's gaming.
ReplyDeleteThank you it was!!
DeleteGreat evenings gaming. Even if you don't drink proper Cherry Coke :P
ReplyDeletePepsi all the way ha ha ha ha
Delete